Welcome, design enthusiasts! As an interior designer who eats, sleeps, and breathes home decor, there’s nothing I find more thrilling than a truly stunning “before and after.” It’s not just about the visual change—it’s about the story, the problem-solving, and the sheer joy of creating a space that truly reflects the people who live there.
Today, I’m taking you behind the velvet rope and into the real homes of real American families. We’ll explore incredible transformations, from drab kitchens to dreamy chef’s paradises and from awkward living rooms to cozy retreats. My goal is to not only inspire you but also to arm you with practical, actionable tips you can use in your own home renovation journey. So, grab your favorite cup of coffee, and let’s get inspired by the power of design!
The Heart of the Home: A Kitchen Reborn
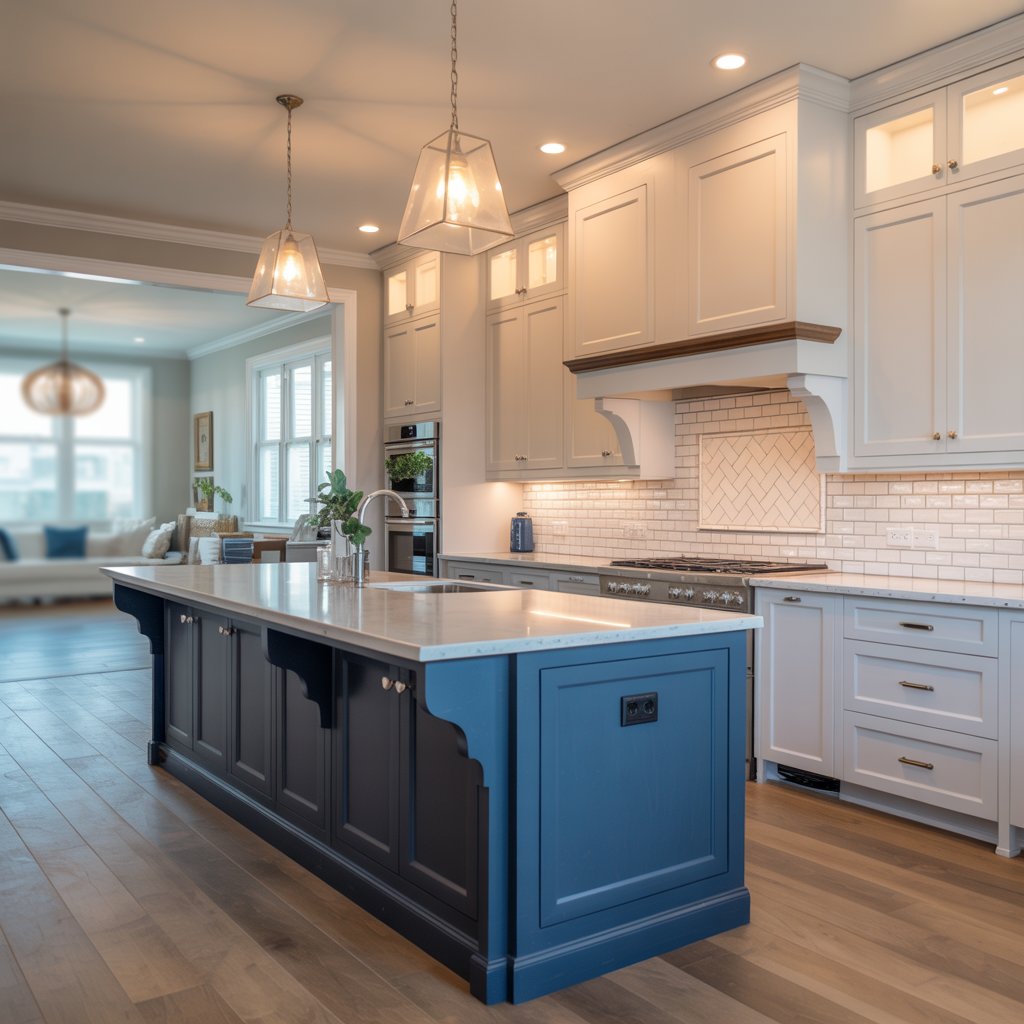
Let’s start where everyone gathers: the kitchen. This particular project was for a young family in Austin, Texas. Their kitchen was a classic case of late 90s fatigue: honey-oak cabinets, dark laminate countertops, a cramped layout, and a complete lack of personality.
The “Before”: The space felt closed off from the rest of the home. The cabinets were dated, the lighting was poor (a single fluorescent fixture!), and there was a glaring lack of functional storage. It was a kitchen they avoided, not a hub for making memories.
The “After” Vision: The homeowners dreamed of a bright, airy, and functional space where they could cook together and entertain friends. They wanted a modern farmhouse feel but with a sleek, timeless twist.
The Transformation Strategy:
Our plan was multi-faceted:
- Layout & Flow: We knocked down a non-load-bearing wall to create an open-concept floor plan that connected the kitchen to the living area. This instantly made the entire first floor feel larger and more inviting.
- Cabinetry & Storage: We installed crisp, shaker-style cabinets in a warm white. To add depth and contrast, we chose a stunning navy blue for the island, which also provided a perfect spot for casual dining with waterfall countertops.
- Countertops & Backsplash: We upgraded to durable quartz countertops that mimic the look of Carrara marble but are far more forgiving for a busy family. The backsplash is a classic white subway tile laid in a herringbone pattern for a touch of modern elegance.
- Lighting: We said goodbye to the fluorescent light and hello to a combination of recessed lighting for overall illumination, stunning pendant lights over the island for task lighting, and under-cabinet LED strips to light up the workspace.
The result is nothing short of breathtaking. The kitchen is now the heart of their home—bright, functional, and utterly beautiful.
Pro Tip: When planning your kitchen remodel, always prioritize the “work triangle” (the distance between the sink, refrigerator, and stove). A efficient triangle is the secret to a functional kitchen, no matter its size.
From Dreary to Dreamy: A Living Room Makeover on a Budget
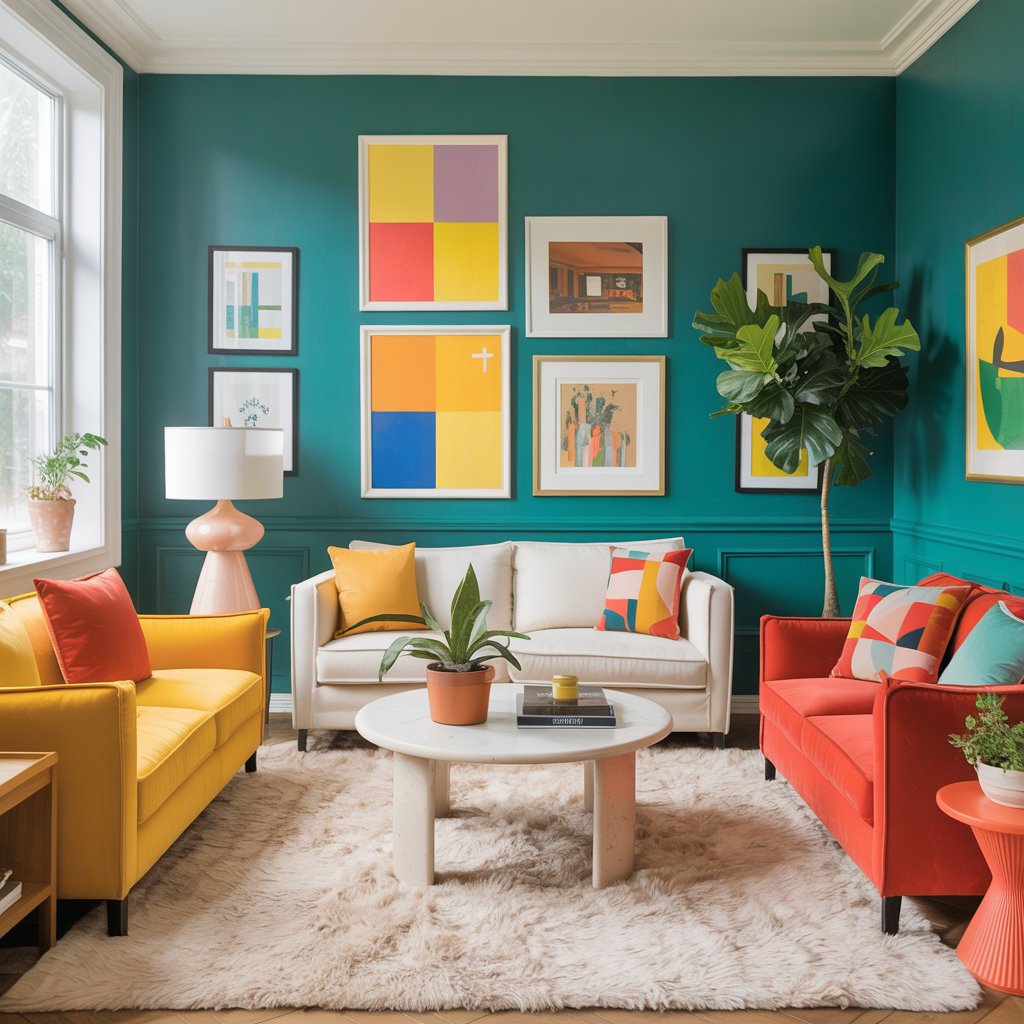
You don’t always need a sledgehammer to create a dramatic change. This living room in a Chicago apartment was proof that strategic budget-friendly updates can have a massive impact. The space was a rental, so structural changes were off the table. The challenge? A beige box with poor lighting, dated fixtures, and furniture that didn’t work together.
The “Before”: The room lacked a cohesive color scheme and felt disjointed. The furniture was pushed against the walls, making conversation difficult. It was a space for existing, not for living.
The “After” Vision: The goal was to create a cozy, inviting, and stylish retreat that reflected the renter’s love for art and travel, all without breaking the bank or making permanent alterations.
The Transformation Strategy:
We focused entirely on cosmetic changes:
- Paint & Walls: We embraced an accent wall in a rich, moody teal to add instant drama and depth. The other walls were painted a bright, warm white to keep the space feeling airy.
- Layout & Furniture: We floated the furniture! Creating a conversation area around a new, larger area rug made the room feel intentional and cozy. We incorporated a mix of second-hand finds (a gorgeous mid-century armchair from a local vintage shop) and affordable new pieces.
- Lighting: We replaced the builder-grade boob light with a statement-making rattan pendant. We also added multiple light sources—a sleek floor lamp and table lamps—to create a warm, layered lighting scheme perfect for relaxing.
- Accessories & Textiles: This is where the magic happened. New throw pillows, a chunky knit blanket, layered rugs, and curated art and objects collected from the homeowner’s travels personalized the space and gave it soul.
The transformation was achieved for under $2,500, proving that great design is about creativity, not just cash.
“Design is not just what it looks like and feels like. Design is how it works.” – Steve Jobs
The Neglected Guest Bathroom: A Spa-Inspired Sanctuary
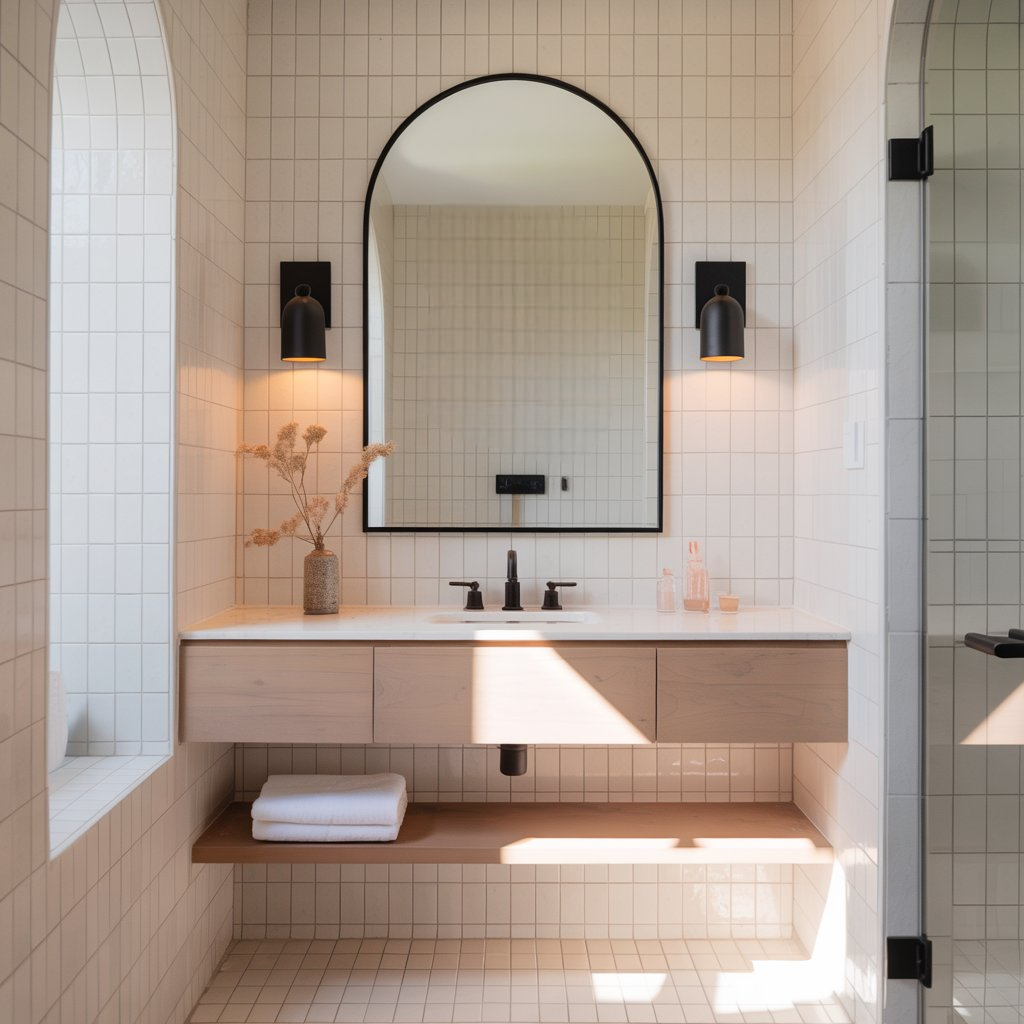
Guest bathrooms are often an afterthought, but they present a huge opportunity to wow your visitors. This bathroom in a Phoenix, Arizona home was stuck in a time warp with pink tiles, a bulky vanity, and a lack of storage.
The “Before”: The space felt cramped, dated, and frankly, a little unwelcoming for guests. The tiles were a major pain point for the homeowners.
The “After” Vision: We aimed to create a serene, spa-like retreat that felt luxurious and spacious, all while working with the existing plumbing footprint to save on costs.
The Transformation Strategy:
- Tackling the Tile: Instead of the messy and expensive process of demoing the old tile, we had it professionally reglazed in a clean, bright white. This saved thousands of dollars and completely changed the feel of the room.
- Vanity & Storage: We swapped the bulky vanity for a sleek, wall-mounted floating vanity in a light wood tone. This opened up the floor space, making the room appear larger. It also provided much-needed hidden storage.
- Fixtures & Hardware: We updated all the fixtures to matte black, creating a modern and cohesive look against the white backdrop. This simple change has a huge impact.
- Mirror & Lighting: A large, arched mirror replaced the small medicine cabinet, reflecting light and amplifying the space. We installed sconces on either side of the mirror for flattering, even light—a key element of any spa bathroom design.
The bathroom is now a tiny oasis that guests (and the homeowners!) love to use.
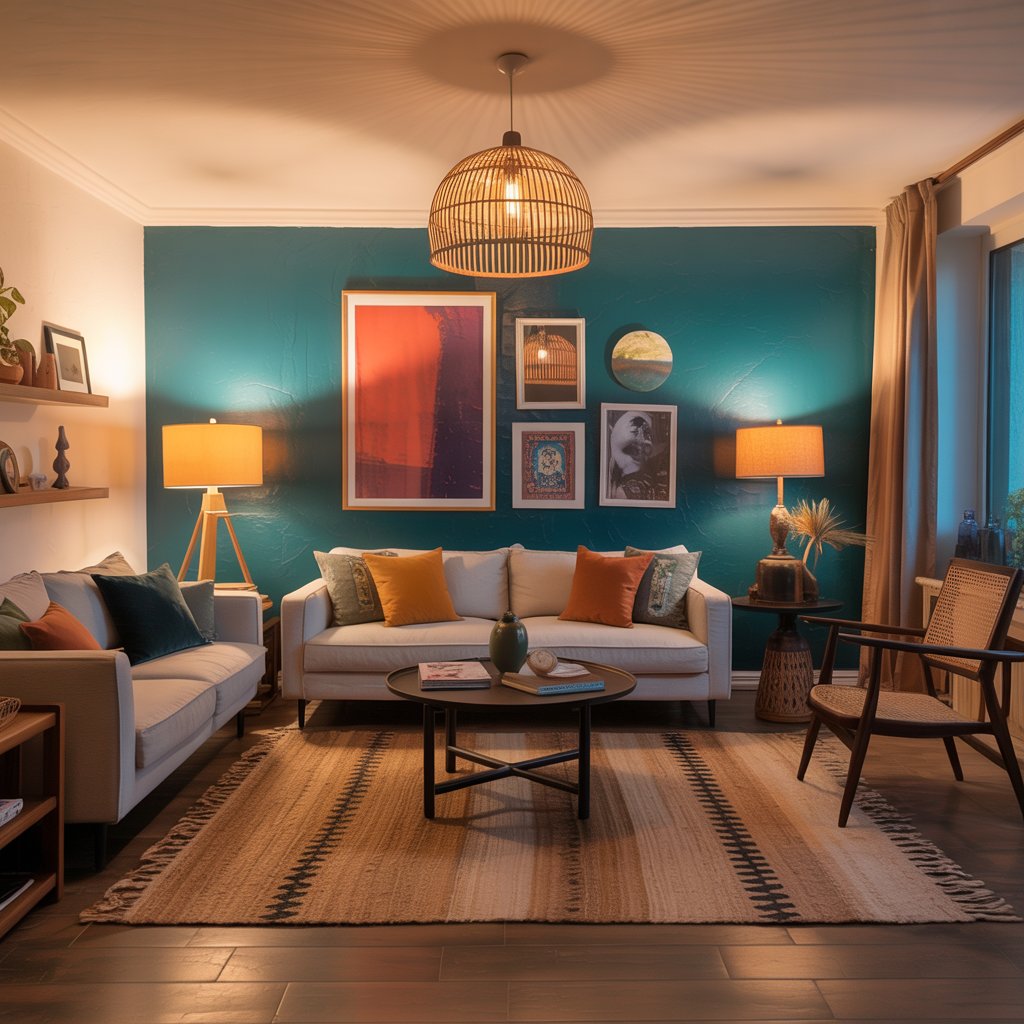
The Awkward Dining Nook: Maximizing Every Square Inch
Many American homes, especially older ones, have awkward nooks and crannies. This San Francisco home had a dining area that was too small for a traditional table and chairs, so it had become a dumping ground for clutter.
The “Before”: The space was non-functional. It was too narrow and was wasted potential.
The “After” Vision: To create a built-in breakfast banquette that would provide comfortable seating, hidden storage, and a defined purpose for the area.
The Transformation Strategy:
We designed and built a custom banquette with a lift-up seat for storing infrequently used items. We paired it with a small-scale round table that allows for easy flow around it. Plush cushions and a pile of throw pillows make it an incredibly inviting spot for morning coffee, homework, or a intimate dinner party. We added a small, dramatic pendant light above the table to define the zone within the larger open-plan room.
This project is a perfect example of how custom built-in solutions can solve awkward layout problems and add incredible character and function to a home.
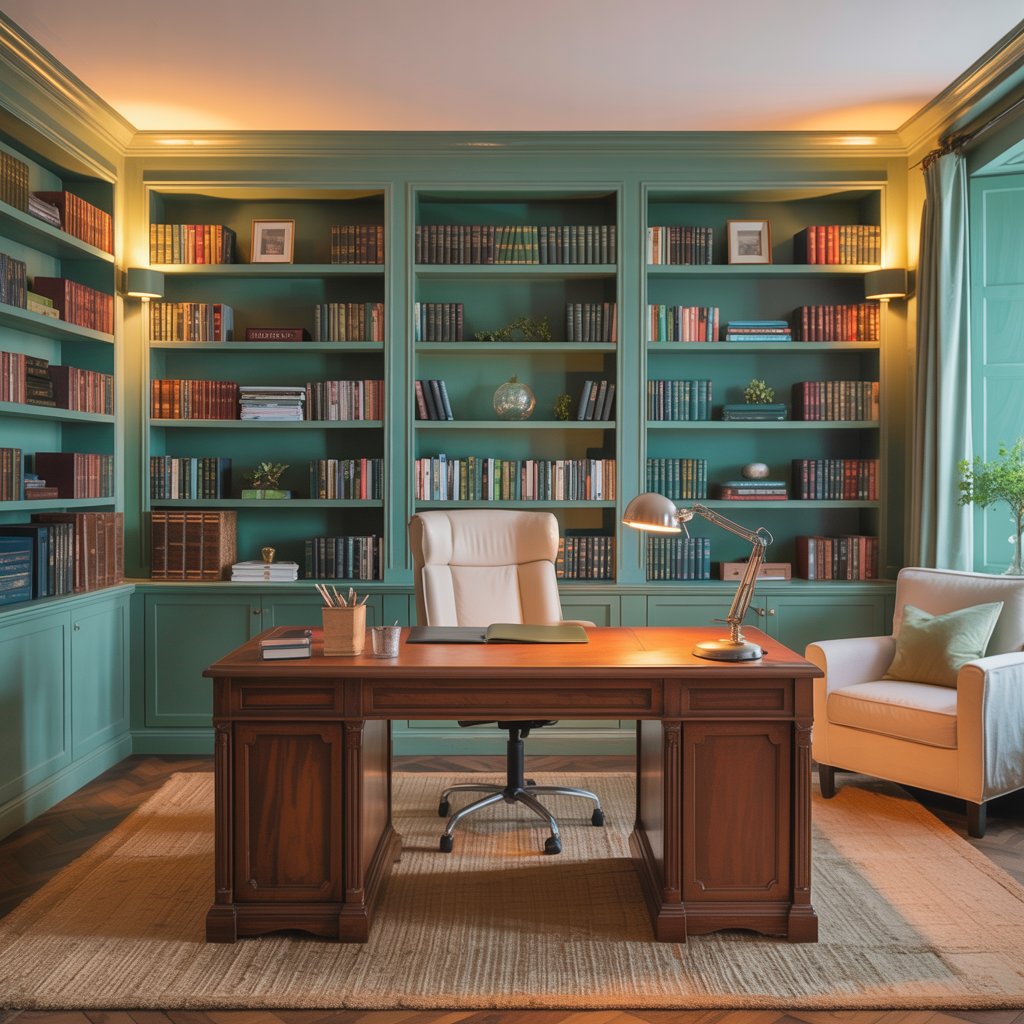
The Home Office: From Closet to Creative Command Center
The shift to remote work made a dedicated home office a necessity. This client was working from a cramped closet in their Seattle home, surrounded by boxes and without any proper lighting or ergonomics.
The “Before”: The space was depressing and utterly unconducive to productivity or creativity.
The “After” Vision: To transform the unused formal living room (a common feature in many US homes that often goes unused) into a bright, organized, and inspiring home office design that could also double as a library.
The Transformation Strategy:
- The Statement Wall: We installed floor-to-ceiling bookshelves along one wall, painted a deep emerald green to create a sense of sophistication and focus.
- Furniture: We chose a large, solid wood desk for a commanding presence and a ergonomic, but beautiful, chair. A comfortable armchair in the corner created a separate reading nook.
- Organization: Built-in shelves provided a place for everything, from books and binders to decorative objects, eliminating clutter from the desk surface.
- Lighting: A combination of overhead lighting, a focused desk lamp, and warm light from the shelves made the space functional at all hours.
The result is a professional and peaceful workspace that the client loves walking into every morning.
Key Takeaways from These Amazing Transformations
While each project was unique, several universal interior design principles emerged that you can apply to any project:
| Principle | Description | Example from Our Projects |
|---|---|---|
| Paint is Power | Never underestimate the transformative power of color. It’s the most cost-effective way to change a room’s entire mood. | The moody teal accent wall in the living room. |
| Lighting is Layers | A single overhead light is rarely enough. Combine ambient (general), task (focused), and accent (decorative) lighting. | The kitchen’s recessed, pendant, and under-cabinet lights. |
| Declutter to Design | Before you decorate, declutter. A clean, organized space allows your design choices to shine. | The built-in storage in the banquette and office. |
| Define the Focal Point | Every room needs a star—a fireplace, a piece of art, a statement wall. Arrange furniture to highlight it. | The emerald green bookshelf wall in the office. |
| Balance & Scale | Mix furniture of different sizes and weights to create visual interest, but ensure pieces are scaled appropriately for the room. | Floating the furniture in the living room to fit the space. |
Your Renovation Roadmap: Where to Start
Feeling inspired but overwhelmed? Here’s a simple list to guide your own home renovation journey:
- Define Your “Why”: How do you want the room to feel? How do you want to use it? Start with emotion and function, not with a Pinterest board of styles.
- Set a Realistic Budget: Be honest about what you can spend and allocate a contingency fund of 10-20% for unexpected surprises.
- Gather Inspiration: Use platforms like Pinterest and Instagram to identify patterns in what you’re drawn to. Is it modern farmhouse? Coastal grandmother? Minimalist?
- Create a Project Plan: Break the project down into phases (e.g., demolition, electrical, painting, decorating) and establish a rough timeline.
- Source Materials & Pros: Decide what you can DIY and what requires a professional. Get multiple quotes for any major work.
- Execute & Adapt: The fun begins! Be prepared to adapt as challenges inevitably arise. Keep your overall vision in mind.
Pro Tip: Create a physical “inspiration box” with paint swatches, fabric samples, and flooring pieces. Seeing how materials interact in your own home’s light is invaluable and prevents costly mistakes.
Conclusion: Your Home, Your Story
The most beautiful homes aren’t the ones that look like a magazine spread; they’re the ones that tell the story of the people who live there. They are filled with functional spaces that support your daily life, colors that make you happy, and objects that hold meaning.
Whether you’re embarking on a full-gut kitchen remodel or simply giving your living room a fresh coat of paint and new throw pillows, remember that every change is a step toward creating a home that inspires you every single day.
Your dream home is waiting. What will your “after” look like?